Exagear Desktop. Run x86 apps on Raspberry Pi & ARMv7 (Part I+Giveaway)
Exagear Desktop: Run x86 apps on Raspberry Pi & ARMv7 (Part I+Giveaway)
Would you like to install some x86 Linux apps on your favorite board?. Surely you've heard about Exagear Desktop, a payment software that allows you to launch applications based on x86 (32-bit). Maybe you have doubts about if it really works.
The company Eltechs has contacted to me to make a review about their product. 5-10% is difference between ExaGear v1.0 and v1.1. I know only one similar solution - Qemu. Performance comparing to Qemu is 5x (500%)!
Are you interested or curious about how it works?. I've seen comparisons and graphics in several sites about their performance, but nowhere have made real test running software. I bring the first analysis about this product and we'll see in the following two articles if it really worth. In addition, we are giving away 10 free licenses of Exagear Desktop.
[ What really about? ]
This solution implement a virtual machine (VM). It's a container for x86 applications inside a board with ARM processor. That is, you have a host computer (PI, ODROID, etc.), an a guest (x86 VM).
I'm going to test the latest version, Eltechs ExaGear Desktop 1.1.
[ Requirements ]
This product takes nearly a year on the market, and it is compatible with the Raspberry Pi 2. Now it brings support also for Raspberry Pi A/B/B+, and have gained support to other boards like ODROID, Banana Pi, CubieBoard or any with ARMv7 processor, as mentioned before.
The requirements what you need:
Raspberry Pi 1, Raspberry Pi 2, ODROID, CubieBoard, CuBox, Utilite, Jetson TK1, Wandboard, Banana Pi or whatever with ARMv7 support.
For applications using MMX/SSE, you also need NEON and vfp support. This technology called NEON handles multimedia accelerate algorithms in general: Decode video or 2D/3D graphics among others. You can check whether your motherboard supports running the following command: cat /proc/cpuinfo | grep 'neon\|vfpv3'.
Ubuntu 12.04/14.04, Debian 7 or Raspbian. Check your Ubuntu version with: cat /etc/lsb-release
binfmt_misc kernel module. You should also have it, but if you want to make sure, execute one of the following instructions and get a result, it means that is supported:
cat /proc/config.gz | gzip -d | grep CONFIG_BINFMT_MISC
cat /proc/sys/fs/binfmt_misc/status
[ Installation ]

In my case, I have several packages: Raspberry Pi, Raspberry Pi 2 and for ARMv7 processors. As you can see, it will install a virtual image adapted to the operating system that you have installed. That is, if your operating system is Raspbian, the installer will use an x86 Raspbian image as a guest.
There are two installation methods:
- Automatic Installation: Run /install-exagear.sh as root in the directory with packages and copy your license key file on it (important). The script will make a series of test and will begin installing the necessary packages:
# ./install-exagear.sh
System memory configuration is determined as 2g/2g
ARCH=armv7l
HOST OS: debian
HOST OS VERSION: "7"
EXAGEAR package: exagear-mem2g_*-1_armhf.deb
EXAGEAR guest image package: 'exagear-guest-debian-7-wine2g_*_all.deb'
Installing prerequisites...
### Installer on Raspbian with a Raspberry Pi 2
- Manual Installation: Following these steps.
sudo apt-get install -y bash coreutils findutils realpath curl binfmt-support cron
sudo dpkg -i exagear_<package_version>.deb
sudo dpkg -i exagear-guest-<package_version>.deb
sudo cp <your license key> /opt/exagear/lic
sudo /opt/exagear/bin/actool
Ready!. Application is installed together with the packages needed to run everything correctly. The image what really does is expand in the directory /opt/exagear/images/<name of your image>, the guest system. So, once we are inside the virtual machine, you will really work in that directory (similar to chroot command).
[ First steps ]
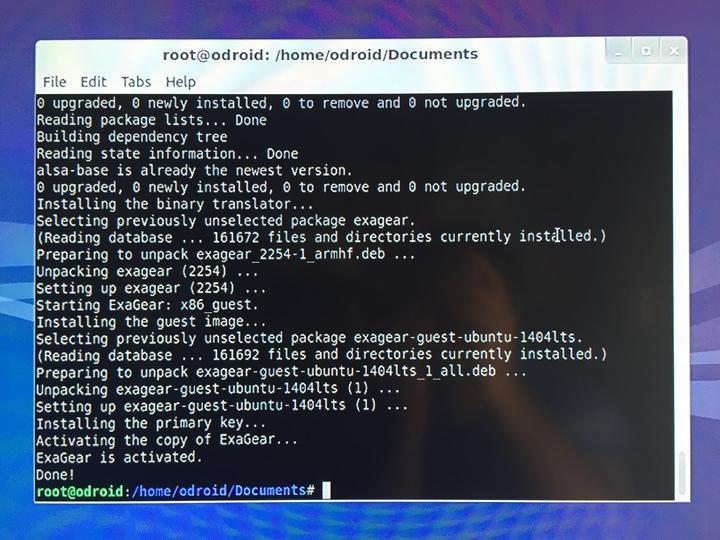
To ensure that the image that we installed is Ok, we can use command-ls. If you have a ODROID board, it shows you:
Installed guest images:
ubuntu-1404lts
To access the guest system, you must type exagear:
$ exagear
Starting the shell in the guest image /opt/exagear/images/ubuntu-1404lts
$ uname -a
Linux odroid 3.10.79-87 #1 SMP PREEMPT Wed Jun 3 14:57:54 BRT 2015 i686 i686 i686 GNU/Linux
Eureka, you have your own x86 VM running!. It was very easy to get here. To return to our guest operating system, type exit
One detail to note is that users share the guest machine to the host computer. That is, within the VM, have the same users and the same folder /home that in your main operating system.
[ Giveaway ]
You have arrived at the end of the first part of this review. If you like to try this software, Eltechs has been kind enough to give 10 free Exagear Desktop licenses for readers of this blog. The rules are simple:
Share a message on Twitter, LinkedIn, FaceBook or Google Plus with the next text: "I want a free license of Exagear Desktop to My Raspberry Pi/Odroid/cubieboard (or whatever you want)". That is, if you want a license for your Raspberry Pi 2, would be: I want a free license of Exagear Desktop to My Raspberry Pi 2. You can see the supported boards on the official website of the product.
Send the link you have just shared to the e-mail: raffle@eltechs.com
Only one email per person and social network is allowed, so you can participate a maximum of 4 times.
It is optional, but if you want, you can follow us on Twitter: ulysess10 | Eltechs
You have until next Sunday 14th to participate.
Good luck!